Conditions of the Ball Screw
Lead angle accuracy
The lead angle accuracy of the ball screw is controlled in accordance with the JIS standard JIS B 1192 (ISO 3408).
Accuracy grades C0 to C5 are defined in the linearity and the directional property, and C7 to C10 in the travel distance error in relation to 300 mm.
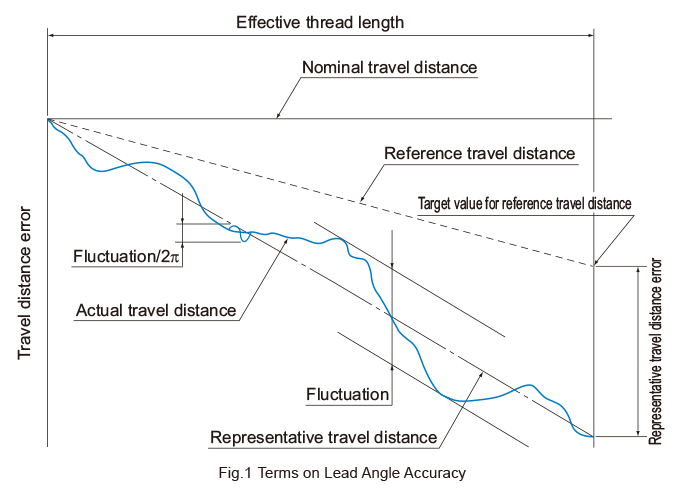
Actual Travel Distance
An error in the travel distance measured with an actual Ball Screw.
Reference Travel Distance
Generally, it is the same as nominal travel distance, but can be an intentionally corrected value of the nominal travel distance according to the intended use.
Target Value for Reference Travel Distance
You may provide some tension in order to prevent the screw shaft from runout, or set the reference travel distance in "negative" or "positive" value in advance given the possible expansion/contraction from external load or temperature. In such cases, indicate a target value for the reference travel distance.
Representative Travel Distance
It is a straight line representing the tendency in the actual travel distance, and obtained with the least squares method from the curve that indicates the actual travel distance.
Representative Travel Distance Error (in ±)
Difference between the representative travel distance and the reference travel distance.
Fluctuation
The maximum width of the actual travel distance between two straight lines drawn in parallel with the representative travel distance.
Fluctuation/300
Indicates a fluctuation against a given thread length of 300 mm.
Fluctuation/2π
A fluctuation in one revolution of the screw shaft.
| Precision Ball Screw | ||||||||||||||
|---|---|---|---|---|---|---|---|---|---|---|---|---|---|---|
| Rolled Ball Screw | ||||||||||||||
| Accuracy grades | C0 | C1 | C2 | C3 | C5 | C7 | C8 | C10 | ||||||
| Effective thread length |
Representative travel distance error |
Fluctuation | Representative travel distance error |
Fluctuation | Representative travel distance error |
Fluctuation | Representative travel distance error |
Fluctuation | Representative travel distance error |
Fluctuation | Travel distance error |
Travel distance error |
Travel distance error |
|
| Above | Or less |
|||||||||||||
| - | 100 | 3 | 3 | 3.5 | 5 | 5 | 7 | 8 | 8 | 18 | 18 | ±50/300mm | ±100/300mm | ±210/300mm |
| 100 | 200 | 3.5 | 3 | 4.5 | 5 | 7 | 7 | 10 | 8 | 20 | 18 | |||
| 200 | 315 | 4 | 3.5 | 6 | 5 | 8 | 7 | 12 | 8 | 23 | 18 | |||
| 315 | 400 | 5 | 3.5 | 7 | 5 | 9 | 7 | 13 | 10 | 25 | 20 | |||
| 400 | 500 | 6 | 4 | 8 | 5 | 10 | 7 | 15 | 10 | 27 | 20 | |||
| 500 | 630 | 6 | 4 | 9 | 6 | 11 | 8 | 16 | 12 | 30 | 23 | |||
| 630 | 800 | 7 | 5 | 10 | 7 | 13 | 9 | 18 | 13 | 35 | 25 | |||
| 800 | 1000 | 8 | 6 | 11 | 8 | 15 | 10 | 21 | 15 | 40 | 27 | |||
| 1000 | 1250 | 9 | 6 | 13 | 9 | 18 | 11 | 24 | 16 | 46 | 30 | |||
| 1250 | 1600 | 11 | 7 | 15 | 10 | 21 | 13 | 29 | 18 | 54 | 35 | |||
| 1600 | 2000 | - | - | 18 | 11 | 25 | 15 | 35 | 21 | 65 | 40 | |||
| 2000 | 2500 | - | - | 22 | 13 | 30 | 18 | 41 | 24 | 77 | 46 | |||
| 2500 | 3150 | - | - | 26 | 15 | 36 | 21 | 50 | 29 | 93 | 54 | |||
| 3150 | 4000 | - | - | 30 | 18 | 44 | 25 | 60 | 35 | 115 | 65 | |||
| 4000 | 5000 | - | - | - | - | 52 | 30 | 72 | 41 | 140 | 77 | |||
| 5000 | 6300 | - | - | - | - | 65 | 36 | 90 | 50 | 170 | 93 | |||
| 6300 | 8000 | - | - | - | - | - | - | 110 | 60 | 210 | 115 | |||
| 8000 | 10000 | - | - | - | - | - | - | - | - | 260 | 140 | |||
| Accuracy grades | C0 | C1 | C2 | C3 | C5 | C7 | C8 | C10 |
|---|---|---|---|---|---|---|---|---|
| Fluctuation/300 | 3.5 | 5 | 7 | 8 | 18 | - | - | - |
| Fluctuation/2π | 3 | 4 | 5 | 6 | 8 | - | - | - |
| Type | Grade | Remarks |
|---|---|---|
| For positioning | 0, 1, 3, 5 | ISO compliant |
| For transport | 0, 1, 3, 5, 7, 10 |
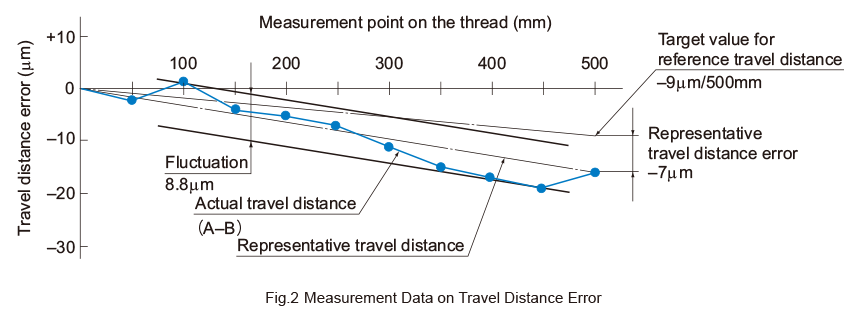
Example: When the lead of a Ball Screw manufactured is measured with a target value for the reference travel distance of ‒9 μm/500 mm, the following data are obtained.
| Command position (A) | 0 | 50 | 100 | 150 |
|---|---|---|---|---|
| Travel distance (B) | 0 | 49.998 | 100.001 | 149.996 |
| Travel distance error (A-B) | 0 | -0.002 | +0.001 | -0.004 |
| Command position (A) | 200 | 250 | 300 | 350 |
|---|---|---|---|---|
| Travel distance (B) | 199.995 | 249.993 | 299.989 | 349.985 |
| Travel distance error (A-B) | -0.005 | -0.007 | -0.011 | -0.015 |
| Command position (A) | 400 | 450 | 500 |
|---|---|---|---|
| Travel distance (B) | 399.983 | 449.981 | 499.984 |
| Travel distance error (A-B) | -0.017 | -0.019 | -0.016 |
The measurement data are expressed in a graph as shown in Fig.2 .
The positioning error (A-B) is indicated as the actual travel distance while the straight line representing the tendency of the (A-B) graph refers to the representative travel distance.
The difference between the reference travel distance and the representative travel distance appears as the representative travel distance error.
[Measurements]
Representative travel distance error: -7μm
Fluctuation: 8.8μm
Accuracy of the Mounting Surface
The accuracy of the Ball Screw mounting surface complies with the JIS standard JIS B 1192 (ISO 3408).
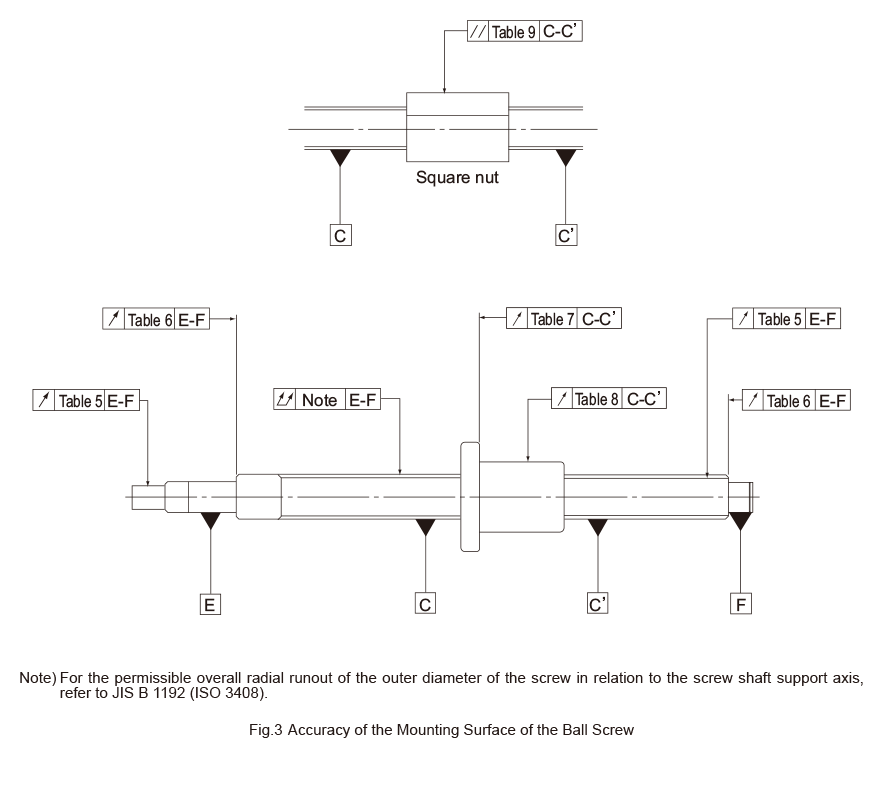
Accuracy of the Mounting Surface
Table5 to Table9 show accuracy standards for the mounting surfaces of the precision Ball Screw.
| Screw shaft outer diameter (mm) |
Runout (maximum) | ||||||
|---|---|---|---|---|---|---|---|
| Above | Or less | C0 | C1 | C2 | C3 | C5 | C7 |
| - | 8 | 3 | 5 | 7 | 8 | 10 | 14 |
| 8 | 12 | 4 | 5 | 7 | 8 | 11 | 14 |
| 12 | 20 | 4 | 6 | 8 | 9 | 12 | 14 |
| 20 | 32 | 5 | 7 | 9 | 10 | 13 | 20 |
| 32 | 50 | 6 | 8 | 10 | 12 | 15 | 20 |
| 50 | 80 | 7 | 9 | 11 | 13 | 17 | 20 |
| 80 | 100 | - | 10 | 12 | 15 | 20 | 30 |
Example: model No. DIK2005-6RRGO+500LC5
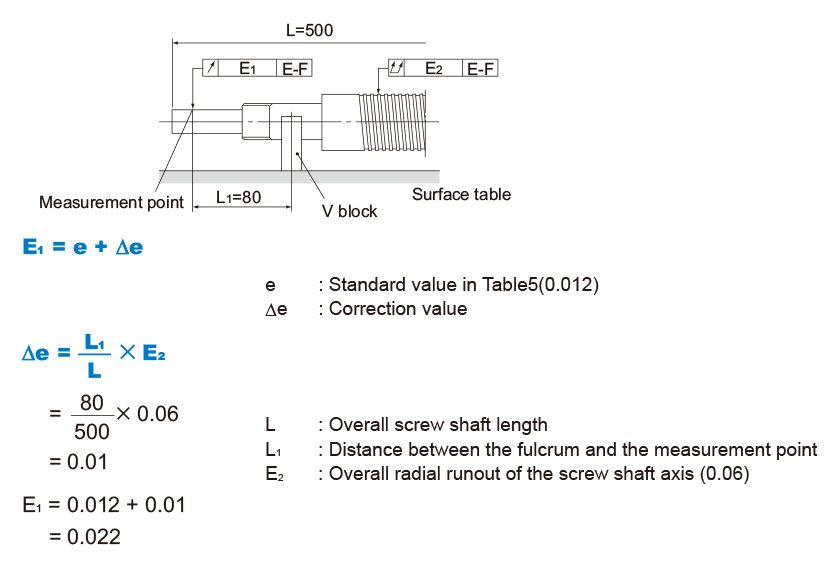
Note) For the permissible overall radial runout of the outer diameter of the screw in relation to the screw shaft support axis, refer to JIS B 1192 (ISO 3408).
| Screw shaft outer diameter (mm) |
Permissible Axial runout (maximum) |
||||||
|---|---|---|---|---|---|---|---|
| Above | Or less | C0 | C1 | C2 | C3 | C5 | C7 |
| - | 8 | 2 | 3 | 3 | 4 | 5 | 7 |
| 8 | 12 | 2 | 3 | 3 | 4 | 5 | 7 |
| 12 | 20 | 2 | 3 | 3 | 4 | 5 | 7 |
| 20 | 32 | 2 | 3 | 3 | 4 | 5 | 7 |
| 32 | 50 | 2 | 3 | 3 | 4 | 5 | 8 |
| 50 | 80 | 3 | 4 | 4 | 5 | 7 | 10 |
| 80 | 100 | - | 4 | 5 | 6 | 8 | 11 |
| Nut diameter (mm) | Permissible Axial runout (maximum) |
||||||
|---|---|---|---|---|---|---|---|
| Above | Or less | C0 | C1 | C2 | C3 | C5 | C7 |
| - | 20 | 5 | 6 | 7 | 8 | 10 | 14 |
| 20 | 32 | 5 | 6 | 7 | 8 | 10 | 14 |
| 32 | 50 | 6 | 7 | 8 | 8 | 11 | 18 |
| 50 | 80 | 7 | 8 | 9 | 10 | 13 | 18 |
| 80 | 125 | 7 | 9 | 10 | 12 | 15 | 20 |
| 125 | 160 | 8 | 10 | 11 | 13 | 17 | 20 |
| 160 | 200 | - | 11 | 12 | 14 | 18 | 25 |
| Nut diameter (mm) | Permissible radial runout | ||||||
|---|---|---|---|---|---|---|---|
| Above | Or less | C0 | C1 | C2 | C3 | C5 | C7 |
| - | 20 | 5 | 6 | 7 | 9 | 12 | 20 |
| 20 | 32 | 6 | 7 | 8 | 10 | 12 | 20 |
| 32 | 50 | 7 | 8 | 10 | 12 | 15 | 30 |
| 50 | 80 | 8 | 10 | 12 | 15 | 19 | 30 |
| 80 | 125 | 9 | 12 | 16 | 20 | 27 | 40 |
| 125 | 160 | 10 | 13 | 17 | 22 | 30 | 40 |
| 160 | 200 | - | 16 | 20 | 25 | 34 | 50 |
| Mounting reference length (mm) |
Permissible parallelism | ||||||
|---|---|---|---|---|---|---|---|
| Above | Or less | C0 | C1 | C2 | C3 | C5 | C7 |
| - | 50 | 5 | 6 | 7 | 8 | 10 | 17 |
| 50 | 100 | 7 | 8 | 9 | 10 | 13 | 17 |
| 100 | 200 | - | 10 | 11 | 13 | 17 | 30 |
Method for Measuring Accuracy of the Mounting Surface
Radial Runout of the Circumference of the Motor-mounting Shaft-end in Relation to the Bearing Journals of the Screw Shaft (see Table5)
Support the end journal of the screw shaft on V blocks. Place a probe on the circumference of the motor-mounting shaft-end, and record the largest difference on the dial gauge as a measurement while rotating the screw shaft through one revolution.

Radial Runout of the Circumference of the Raceway Threads in Relation to the Bearing Journals of the Screw Shaft (see Table5)
Support the end journal of the screw shaft on V blocks. Place a probe on the circumference of the nut, and record the largest difference on the dial gauge as a measurement while rotating the screw shaft by one revolution without rotating the nut.

Axial Runout of the Support End Face in Relation to the Screw Shaft Axis Support (see Table6)
Support the bearing journal portions of the screw shaft on V blocks. Place a probe on the screw shaft’s supporting portion end, and record the largest difference on the dial gauge as a measurement while rotating the screw shaft through one revolution.

Axial Runout of the Flange Mounting Surface in Relation to the Screw Shaft Axis (see Table7)
Support the thread of the screw shaft on V blocks near the nut. Place a probe on the flange end, and record the largest difference on the dial gauge as a measurement while simultaneously rotating the screw shaft and the nut through one revolution.
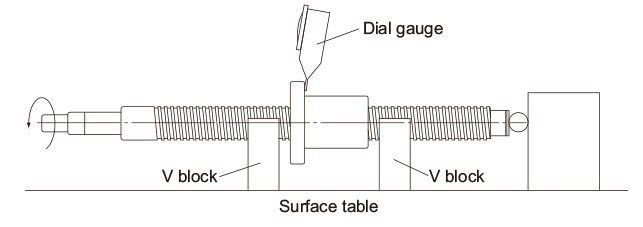
Radial Runout of the Nut Circumference in Relation to the Screw Shaft Axis (see Table8 on A15-16 )
Support the thread of the screw shaft on V blocks near the nut. Place a probe on the circumference of the nut, and record the largest difference on the dial gauge as a measurement while rotating the nut through one revolution without rotating the screw shaft.

Parallelism of the Nut Circumference (Flat Mounting Surface) to the Screw Shaft Axis (see Table9)
Support the thread of the screw shaft on V blocks near the nut. Place a probe on the circumference of the nut (flat mounting surface), and record the largest difference on the dial gauge as a measurement while moving the dial gauge in parallel with the screw shaft.

Overall Radial Runout of the Screw Diameter Relative to the Shaft Support Axis
Support the supporting portion of the screw shaft on V blocks. Place a probe on the circumference of the screw shaft, and record the largest difference on the dial gauge at several points in the axial directions as a measurement while rotating the screw shaft through one revolution.

- Note) For the permissible overall radial runout of the outer diameter of the screw in relation to the screw shaft support axis, refer to JIS B 1192 (ISO 3408).
Axial Clearance
Axial Clearance of the Precision Ball Screw
Table10 shows the axial clearance of the precision Ball Screw. If the manufacturing length exceeds the value in Table11 , the resultant clearance may partially be negative (preload applied).
The manufacturing limit lengths of the Ball Screws compliant with the DIN standard are provided in Table12 .For the axial clearance of the Precision Caged Ball Screw, see Precision Caged Ball Screw.
| Clearance symbol | G0 | GT | G1 | G2 | G3 |
|---|---|---|---|---|---|
| Axial Clearance | 0 or less | 0 to 0.005 | 0 to 0.01 | 0 to 0.02 | 0 to 0.05 |
| Screw shaft outer diameter |
Clearance GT | Clearance G1 | Clearance G2 | |||||||||||
|---|---|---|---|---|---|---|---|---|---|---|---|---|---|---|
| C0 | C1 | C2・C3 | C5 | C0 | C1 | C2・C3 | C5 | C0 | C1 | C2 | C3 | C5 | C7 | |
| 4・6 | 80 | 80 | 80 | 100 | 80 | 80 | 80 | 100 | 80 | 80 | 80 | 80 | 100 | 120 |
| 8 | 230 | 250 | 250 | 200 | 230 | 250 | 250 | 250 | 230 | 250 | 250 | 250 | 300 | 300 |
| 10 | 250 | 250 | 250 | 200 | 250 | 250 | 250 | 250 | 250 | 250 | 250 | 250 | 300 | 300 |
| 12・13 | 440 | 500 | 500 | 400 | 440 | 500 | 500 | 500 | 440 | 500 | 630 | 680 | 600 | 500 |
| 14 | 500 | 500 | 500 | 400 | 500 | 500 | 500 | 500 | 530 | 620 | 700 | 700 | 600 | 500 |
| 15 | 500 | 500 | 500 | 400 | 500 | 500 | 500 | 500 | 570 | 670 | 700 | 700 | 600 | 500 |
| 16 | 500 | 500 | 500 | 400 | 500 | 500 | 500 | 500 | 620 | 700 | 700 | 700 | 600 | 500 |
| 18 | 720 | 800 | 800 | 700 | 720 | 800 | 800 | 700 | 720 | 840 | 1000 | 1000 | 1000 | 1000 |
| 20 | 800 | 800 | 800 | 700 | 800 | 800 | 800 | 700 | 820 | 950 | 1000 | 1000 | 1000 | 1000 |
| 25 | 800 | 800 | 800 | 700 | 800 | 800 | 800 | 700 | 1000 | 1000 | 1000 | 1000 | 1000 | 1000 |
| 28 | 900 | 900 | 900 | 800 | 1100 | 1100 | 1100 | 900 | 1300 | 1400 | 1400 | 1400 | 1200 | 1200 |
| 30・32 | 900 | 900 | 900 | 800 | 1100 | 1100 | 1100 | 900 | 1400 | 1400 | 1400 | 1400 | 1200 | 1200 |
| 36・40・45 | 1000 | 1000 | 1000 | 800 | 1300 | 1300 | 1300 | 1000 | 2000 | 2000 | 2000 | 2000 | 1500 | 1500 |
| 50・55・63・70 | 1200 | 1200 | 1200 | 1000 | 1600 | 1600 | 1600 | 1300 | 2000 | 2500 | 2500 | 2500 | 2000 | 2000 |
| 80・100 | - | - | - | - | 1800 | 1800 | 1800 | 1500 | 2000 | 4000 | 4000 | 4000 | 3000 | 3000 |
Axial Clearance of the Rolled Ball Screw
Table12 shows axial clearance of the rolled BallScrew.
| Screw shaft outer diameter | Axial clearance (maximum) |
|---|---|
| 6 to 12 | 0.05 |
| 14 to 28 | 0.1 |
| 30 to 32 | 0.14 |
| 36 to 45 | 0.17 |
| 50 | 0.2 |
Preload
A preload is provided in order to eliminate the axial clearance and minimize the displacement under an axial load.
When performing a highly accurate positioning, a preload is generally provided.
Rigidity of the Ball Screw under a Preload
When a preload is provided to the Ball Screw, the rigidity of the nut is increased.
Fig.4 shows elastic displacement curves of the Ball Screw under a preload and without a preload.
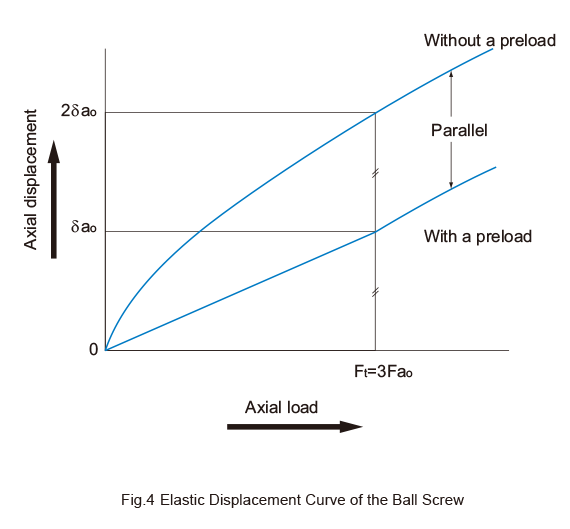
Fig.5 shows a single-nut type of the Ball Screw.
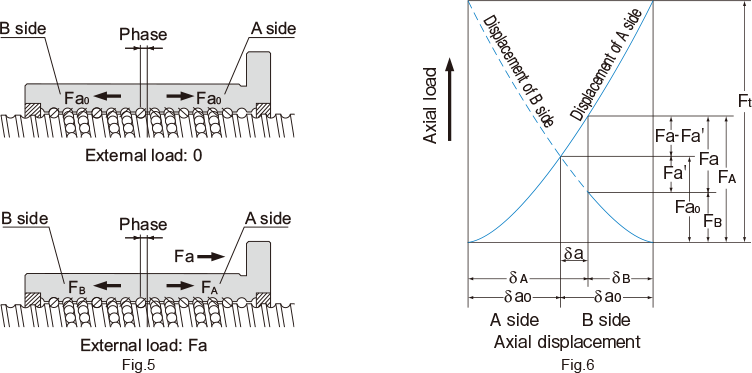
The A and B sides are provided with preload (Fa0) by changing the groove pitch in the center of the nut to create a phase. Because of the preload, the A and B sides are elastically displaced by δa0 each. If an axial load (Fa) is applied from outside in this state, the displacement of the A and B sides is calculated as follows.

In other words, the loads on the A and B sides are expressed as follows:

Therefore, under a preload, the load that the A side receives equals to Fa‒Fa'. This means that since load Fa', which is applied when the A side receives no preload, is deducted from Fa, the displacement of the A side is smaller.
This effect extends to the point where the displacement (δa0) caused by the preload applied on the B side reaches zero.
To what extent is the elastic displacement reduced? The relationship between the axial load on the Ball Screw under no preload and the elastic displacement can be expressed by δa∝Fa2/3 . From Fig.6 , the following equations are established.

Thus, the Ball Screw under a preload is displaced by δa0 when an axial load (Ft) approximately three times greater than the preload is provided from outside. As a result, the displacement of the Ball Screw under a preload is half the displacement (2δa0 ) of the Ball Screw without a preload.
As stated above, since the preloading is effective up to approximately three times the applied preload, the optimum preload is one third of the maximum axial load.
Note that an excessive preload adversely affects the service life and heat generation. The maximum preload should be set at 10% of the basic dynamic load rating (Ca) in the axial direction.
Preload Torque
The preload torque of the Ball Screw is controlled in accordance with the JIS standard JIS B 1192 (ISO 3408).
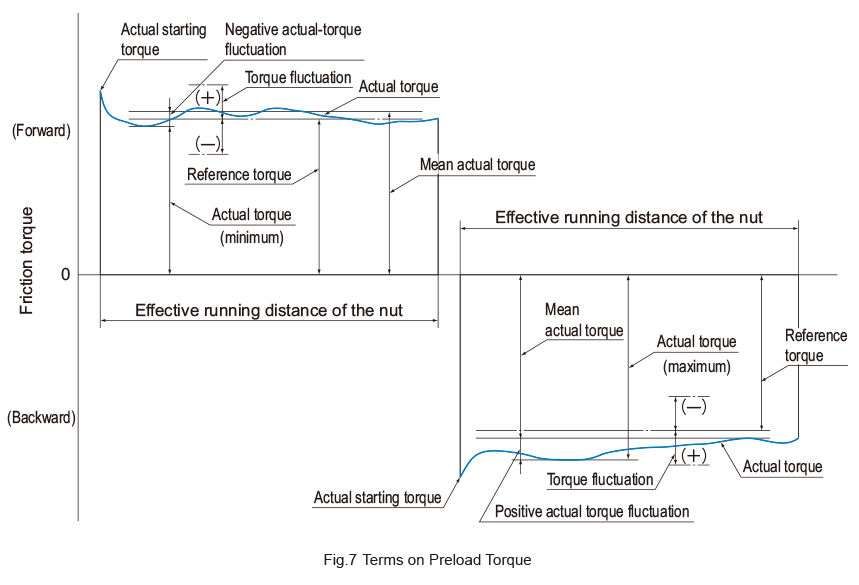
Dynamic Preload Torque
A torque required to continuously rotate the screw shaft of a Ball Screw under a given preload without an external load applied.
Actual Torque
A dynamic preload torque measured with an actual Ball Screw.
Torque Fluctuation
Variation in a dynamic preload torque set at a target value. It can be positive or negative in relation to the reference torque.
Coefficient of Torque Fluctuation
Ratio of torque fluctuation to the reference torque.
Reference Torque
A dynamic preload torque set as a target.
Calculating the Reference Torque
The reference torque of a Ball Screw provided with a preload is obtained in the following equation (4).
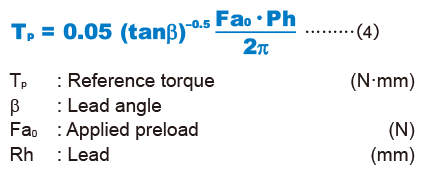
Note: The values listed above and the preload indicated on the delivery specification drawing are without retainers, grease, or seals.
Example: When a preload of 3,000 N is provided to the Ball Screw model BIF4010-10G0 + 1500LC3 with a thread length of 1,300 mm (shaft diameter: 40 mm; ball center-to-center diameter:41.75 mm; lead: 10 mm), the preload torque of the Ball Screw is calculated in the steps below.
Calculating the Reference Torque

Calculating the Torque Fluctuation

Thus, with the reference torque in Table14 being between 600 and 1,000 N・mm, effective thread length 4,000 mm or less and accuracy grade C3, the coefficient of torque fluctuation is obtained as ±30%.
As a result, the torque fluctuation is calculated as follows.
865×(1±0.3) = 606 N・mm to 1125 N・mm
Result
| Reference torque | 865 N・mn |
|---|---|
| Torque fluctuation | 606 N・mm to 1125 N・mm |
| Reference torque N・mm |
Effective thread length | |||||||||||||
|---|---|---|---|---|---|---|---|---|---|---|---|---|---|---|
| 4000mm or less | Above 4,000 mm and 10,000 mm or less |
|||||||||||||
 |
 |
- | ||||||||||||
| Accuracy grades | Accuracy grades | Accuracy grades | ||||||||||||
| Above | Or less | C0 | C1 | C3 | C5 | C7 | C0 | C1 | C3 | C5 | C7 | C3 | C5 | C7 |
| 200 | 400 | ±30% | ±35% | ±40% | ±50% | - | ±40% | ±40% | ±50% | ±60% | - | - | - | - |
| 400 | 600 | ±25% | ±30% | ±35% | ±40% | - | ±35% | ±35% | ±40% | ±45% | - | - | - | - |
| 600 | 1000 | ±20% | ±25% | ±30% | ±35% | ±40% | ±30% | ±30% | ±35% | ±40% | ±45% | ±40% | ±45% | ±50% |
| 1000 | 2500 | ±15% | ±20% | ±25% | ±30% | ±35% | ±25% | ±25% | ±30% | ±35% | ±40% | ±35% | ±40% | ±45% |
| 2500 | 6300 | ±10% | ±15% | ±20% | ±25% | ±30% | ±20% | ±20% | ±25% | ±30% | ±35% | ±30% | ±35% | ±40% |
| 6300 | 10000 | - | - | ±15% | ±20% | ±30% | - | - | ±20% | ±25% | ±35% | ±25% | ±30% | ±35% |
Point of Selection
- Conditions of the Ball Screw
- Conditions of the Ball Screw
- Estimating the shaft length
- Selecting lead・Selecting a shaft diameter
- Method for Mounting the Ball Screw Shaft
- Permissible Axial Load
- Permissible Rotational Speed
- Selecting a Nut
- Calculating the permissible axial load
- Considering the Service Life
- Studying the Rigidity
- Studying the Positioning Accuracy
- Studying the Rotational Torque
- Studying the Driving Motor